Rabu, 24 Juli 2019

Membuat Laporan Java

Cara Membuat dan Contoh Sederhana Laporan dengan iReport Java Netbeans

Bingung cara membuat Report / Laporan pada Java Netbeans? Pas banget kalau kamu kesini. Saya akan jelaskan apa itu iReport, cara, contoh laporan dsb..
iReport adalah tools membantu mendesain laporan secara visual yang digunakan para developer / programmer java dikarenakan fitur yang dimiliki iReport sangat lengkap, mudah dan praktis.
Lalu JasperReport itu apa dong? Berbeda dengan iReport sob.
JasperReport itu merupakan library yang digunakan untuk pemrosesan Laporan.
Jadi iReport itu merupakan bentuk Visual nya agar kita ga perlu menghapal tag – tag yang diperlukan JasperReport, tapi cukup berhadapan dengan Visual nya iReport yaitu tinggal tarik – geser klik klik dsb.. hehe singkat nya sih gitu, silahkan dikoreksi atau ditambahkan kalau saya salah ya
Setelah saya jelaskan cara install, cara memasukkan librarynya, dan contohnya. Kalau masih belum paham dan masih bingung cara install? Tenang, kalian bisa tonton video gilacoding diyoutube pada akhir halaman.
Kalian download dan install dulu Java Netbeans nya, pastikan JDK sudah terinstall ya.
Baik bahan – bahan bisa kalian download disini :
  1. Netbeans (skip kalau udah install)
  2. JDK (skip kalau udah install)
  3. iReport & Library ( << klik aja untuk file jar , dan ireportnya)
Setelah install sampai JDK nya, lalu install iReport. Cara nya seperti ini :
  • Extract iReport, kalian akan menemukan 4 File dengan format file nbm.
  • Buka Netbeans, pilih menu Tools > Plugins > (klik tab Downloaded)
ireport java
  • Klik button Add, cari file iReport yang sudah kalian extract tadi
  • Setelah membuka folder extract td, CTRL + A, lalu pilih open ke empat filenya
  • Pastikan sudah tercentang semua, klik Install
  • Kalian next, next dan install saja IDE Installernya
Proses install iReport gitu aja sob, sekarang kita akan praktekkan langsung contoh menggunakan iReport pada Java Netbeans. Yuk ikuti :
  • Extract File Library nya, copy ke Folder Netbeans Project Kalian, kalau saya ada di direktori : Documents > NetBeansProjects > belajarReport > (paste disini)
  • Pada Netbeans, Pilih project nya, pada Libraries klik kanan, Add Jar/Folder. Cari semua file library di project kalian tadi, CTRL + A, lalu Open
  • Kembali ke Libraries tadi, klik kanan Add Library, pilih MySQL JDBC Driver
  • Sekarang buat View nya dengan JframeFrom pada package belajarreport (saya yakin kalian dah bisa, klo ga bisa lihat video sob)
  • Buat View hanya 1 button saja dulu, sebagai contoh untuk klik dan memanggil laporan nya
  • Pada package belajarreport, klik kanan, pilih New lalu Other, Cari Report dan pilih Report Wizard
  • Next saja, pilih Layout yang bagus (pastikan internet biar banyak pilihan layoutnya) dan beri nama report sesuai keperluan kalian, kalau saya reportSembako.jrxml
  • Setelah memberi nama, akan ada pilihan Connections. Kalian klik button New, pilih Database JDBC connection
  • Pastikan XAMPP MYSQL kalian sudah MENYALA, isi seperti berikut ini :
  • Sebelum kalian save, pastikan klik Test dulu untuk mentest koneksi Project kita apakah berhasil terkoneksi ke MySQL nya
  • Masukkan Query nya dari tabel kalian
  • Next dan pindahkan semua fields ke kanan dengan mengklik tanda >> atau kalian pilih field mana saja yang nanti nya akan ditampilkan pada Laporan / Report
  • Next, dan Finish
  • Buka file reportSembako.jrxml, klik Preview (pastikan tabel kalian memiliki data)
  • Yhaa, berhasil tampil laporan nya
report java gilacoding
  • Untuk edit header dsb.. kalian cukup edit di tab Designer
  • Sekarang gimana cara nya jika button yang kita buat pada JframeFrom tadi ketika di klik menampilkan laporan ini?
  • Buat dulu Class Koneksi , isi nya :
public static Connection getConnection() {
        Connection connection = null;
        String driver = "com.mysql.jdbc.Driver";
        String url = "jdbc:mysql://localhost:3306/db_belajar"; //ganti dengan database mu
        String user = "root";
        String password = "";
        if (connection == null) {
            try {
                Class.forName(driver);
                connection = DriverManager.getConnection(url, user, password);
            } catch (ClassNotFoundException | SQLException error) {
               System.exit(0);
            }

        }
        return connection;
    }
  • Note : Sesuaikan import nya sesuai dengan divideo yah
  • Pada button cetak, double click dan isi seperti ini :
   try {
        JasperPrint jp = JasperFillManager.fillReport(getClass().getResourceAsStream("reportSembako.jasper"), null, Koneksi.getConnection());
        JasperViewer.viewReport(jp, false);
        } catch(Exception e) {
            JOptionPane.showMessageDialog(rootPane, e);
        }
Save dan jalankan. Kalau saya sih udah berhasil nih, kalian?
Share dibawah ya sob hehe
Untuk video youtube bisa kalian lihat disini :
Terimakasih sobat, semoga pelajaran tentang membuat contoh laporan pada Java ini bermanfaat untuk kita semua. Amin


Sumber : https://gilacoding.com/read/cara-membuat-dan-contoh-sederhana-laporan-dengan-ireport-java-netbeans
Read More

Jumat, 12 Juli 2019

New Flasher Xperia

Newflasher guide to install new firmware for Xperia XZ Premium, XZ1 and more


One of the most frequent questions we get asked from Sony Xperia owners is how to change the firmware. Whether that relates to upgrading/downgrading major Android versions, debranding the handset or simply changing the firmware region for faster updates.
Using the Flashtool application has been the main way to go about this, but when Sony released its 2017 Xperia models, it changed the flashing process which rendered Flashtool redundant. This is where Newflasher, a command line Xperia flashing tool developed by XDA member munjeni, comes in.
While Flashtool was recently updated to support some of the key 2017 Xperia models, including the Xperia XZ Premium and XZ1, we thought it would be useful to write a tutorial for Newsflasher as it provides an alternative, easy-to-use way to flash your Xperia firmware.
The instructions below can be used to flash ANY firmware build for 2017 Sony Xperia devices and beyond. It is a useful process for those wanting to debrand, or if you are a US Xperia owner wanting to change your firmware version to add back the fingerprint sensor functionality.

Install new Xperia firmware using Newflasher [Tutorial]

Disclaimer: Please read the following instructions thoroughly before attempting to flash your phone. Xperia Blog absolves itself from any responsibility should something go wrong. Please proceed with caution and at your own risk.
This guide is only intended to be used for Sony Xperia devices from 2017 and onwards. Please use Flashtool to flash firmware for older devices.

Note: You will not void the warranty of your Sony Xperia device by flashing new firmware using this guide. In addition, you do NOT need to unlock your bootloader nor do you need root to flash your handset.
By following this method to flash your phone you will end up wiping all data. Therefore, please ensure you back up your data and any photos/videos you have taken. You can find Sony’s own backup service within ‘Settings > System > Xperia Backup & Restore’.

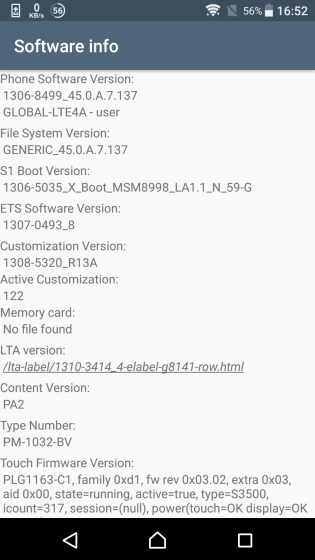
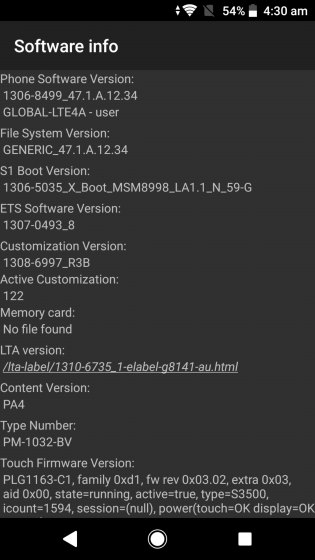
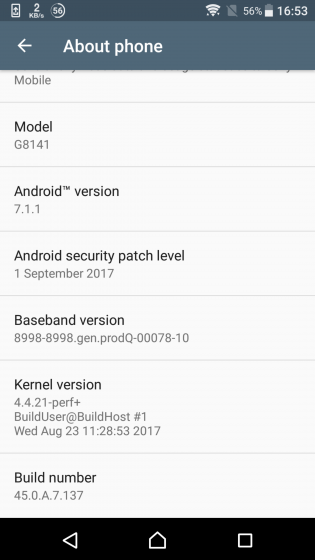
For the purpose of this guide, we will be flashing a Sony Xperia XZ Premium (G8141) from Android 7.1.1 Nougat to Android 8.0.0 Oreo. We will also be changing the handset’s region from UK (1308-5320) to Australia (1308-6997). Below are the reference screenshots prior to starting. The left screenshot shows the Android version and current firmware build number. The right screenshot shows the current region software version (see the 8-digit number under ‘Customization Version’).

Part 1: Preparation

One of the primary reasons people encounter problems in flashing their device is due to not installing the correct drivers on their computer. Please ensure that drivers for your Sony Xperia device are correctly installed on your PC before attempting to install new software.
Note: This guide is written for Windows 10 users in mind only.
1) Install drivers for your Sony Xperia
You need to ensure that your PC has all of the necessary drivers installed for your Sony Xperia device. The best way to do this is to install Sony Xperia Companion.
Make sure you connect your Xperia to the PC before starting the process to download the necessary USB and ADB drivers. The best way to do this is to power off your Sony Xperia and then connect to your PC whilst holding the volume down button.
2) Download Newflasher
Download Newflasher from XDA. We are using Newflasher v10 for the purpose of this guide. Once downloaded, extract the RAR file to an appropriate location on your computer. You can use WinRAR to extract the file.
3) Install Flashtool and XperiFirm
Download and install Flashtool from the official website here. Flashtool integrates the XperiFirm application, which you will need to download the necessary firmware files.
While we won’t be using Flashtool to flash firmware in this guide, by installing the application you can ensure that the necessary Xperia drivers will be installed on your computer. Install Flashtool drivers from the following location: ‘C:\Flashtool\drivers’. Tick the “Flashmode Drivers” and “Fastboot Drivers” to install.

4) Enable “USB debugging” and “Unknown sources” on your Sony Xperia device
‘USB debugging’: Settings > Developer options
‘Unknown sources’: Settings > Security

Part 2: Download Xperia firmware

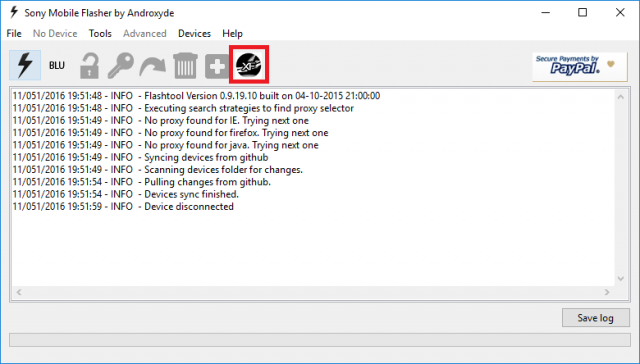
You will need to download firmware files to install new software onto your device. First, launch Flashtool and then click on the XperiFirm icon as highlighted below.
MM Xperia Guide_1_Red
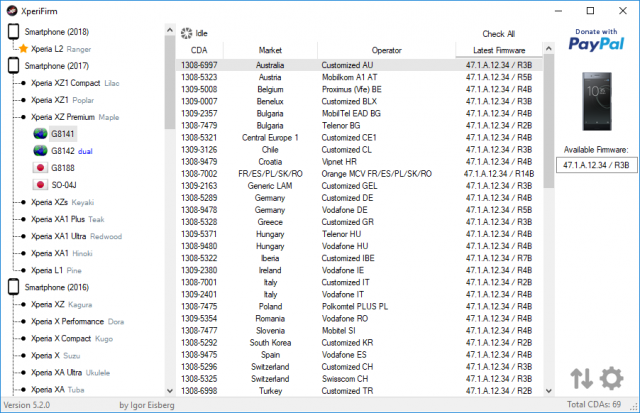
You should now see the XperiFirm software launch into a new window. Navigate to your handset on the left pane. You can then choose the firmware for your region/carrier in the middle pane. The pane on the right side will show you which firmware is available for that region. Click on it to download the file.
Important: Only download firmware for your model and variant number. For example, if you own an Xperia XZ Premium (G8141), only browse and download the firmware builds listed under G8141.

Once clicked, you are asked to confirm whether you want to download the firmware. Click “Download” to proceed.

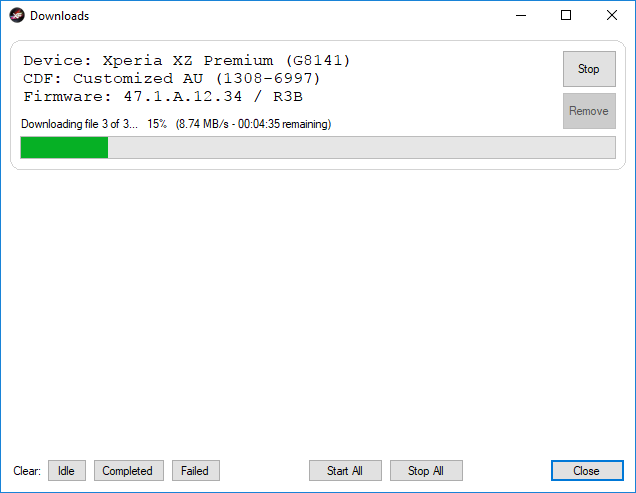
This will launch a pop-up ‘Downloads’ window, showing the progress of the download. Once it is complete, click “Close” to proceed to the next step. Make sure you note the folder where you have downloaded the firmware too.

Part 3: Prepare firmware for flashing

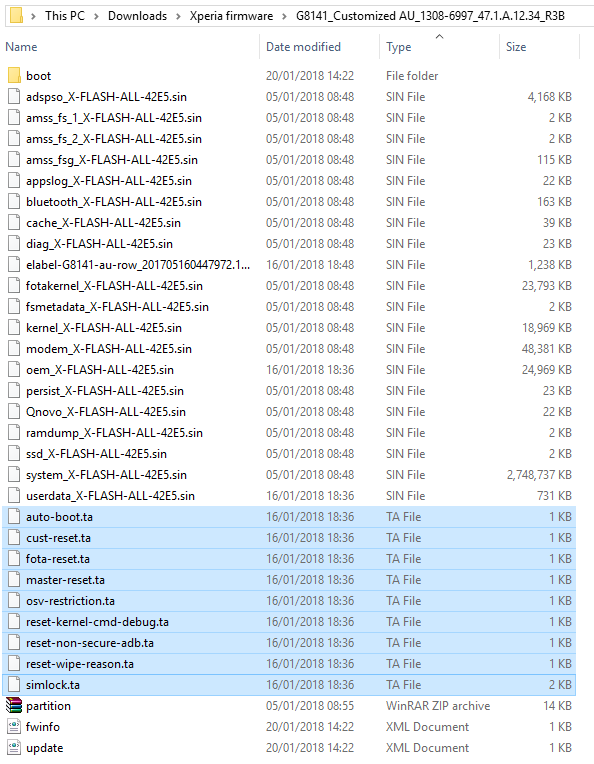
If you have followed the above steps correctly, you should now have two new folders on your computer. One firmware file (in this example, called “G8141_Customized AU_1308-6997_47.1.A.12.34_R3B“), and another folder called “Newflasher“.

Here are the untouched contents of the Xperia firmware folder for your reference.

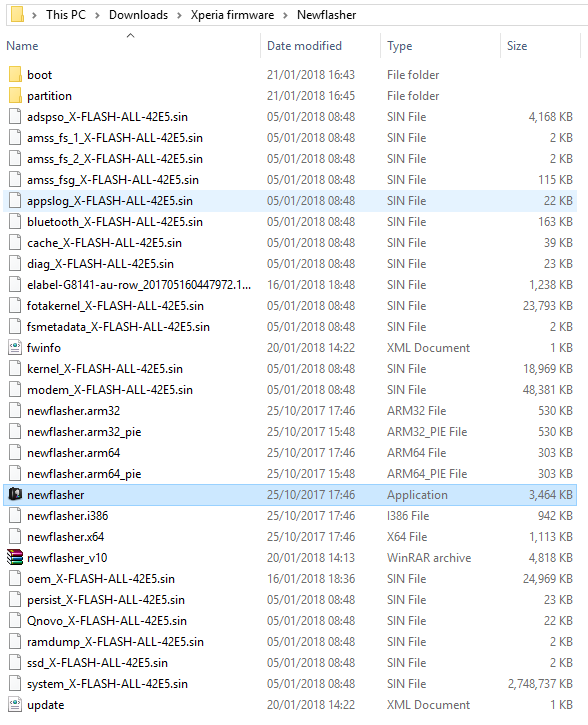
Here are the untouched contents of the Newflasher folder for your reference. You can see that we have used Newflasher v10 for this tutorial.

Now open the firmware folder. Select and delete all of the .ta files in the main folder.

Now open the ‘boot’ folder within the main firmware folder. There is one .ta file in here called ‘Maple_XBootConfig_MiscTA‘ that you also need to delete.

Create a new folder called ‘partition’ in the main firmware folder. Now extract partition.zip which is found in the main firmware folder into this new ‘partition’ folder. The files extracted will look something like the picture below.

Once you have completed all of the above, your firmware folder should look something like the below. All of the .ta files are deleted and the partition.zip file has been extracted into a new ‘partition’ folder.

Now the final step in preparing your firmware, is to copy the entire contents of the firmware folder to the Newflasher folder. Once complete, your Newflasher folder should look like something below. The highlighted files are those copied across from your firmware folder.

Part 4: Flash Xperia firmware

If you’ve reached this stage, then that’s the hardest part done. This next section involves the process of actually flashing your Sony Xperia device.
Connect your Sony Xperia device. Make sure the device is powered off and then hold the ‘volume down’ button whilst connecting the USB cable. Double click the ‘newflasher’ application as highlighted below.

A Windows command prompt will now open. Type ‘n’ and press Enter.

You will once again need to type ‘n’ and press Enter.

Your Sony Xperia device will now begin to flash new firmware.

Once complete, you will receive a message that “You can disconnect your device when you close newflasher.exe“. Congratulations, your Sony Xperia device has now been successfully flashed to new firmware.

Disconnect your Xperia device and power on the handset. Don’t worry if it takes a while for the handset to boot, this is to be expected. To confirm that you have upgraded the phone software, click on ‘Settings > About phone’, which will reveal your new Android version and firmware build number.
If you would also like to confirm the region firmware that you have downloaded, you will need to access the service menu option (open the dialler and enter *#*#7378423#*#*). Click ‘Service info > Software info’. Search for the 8-digit number under “Customization Version”. For example, you will notice below that the software customisation version of 1308-6997 matches the Australia firmware that we downloaded in the XperiFirm screenshots above.
Read More

Rabu, 27 Maret 2019

Hapus Kontrol Panas Xperia XZ

Masuk ke adb.exe pada flash tools

masuk cmd lalu menuju ke C:\Flashtool\x10flasher_lib

cd C:\Flashtool\x10flasher_lib

adb shell

pm uninstall -k --user 0 com.sonyericsson.psm.sysmonservice


Read More

Senin, 07 Januari 2019

Jika iTunes tidak mengenali iPhone, iPad, atau iPod Anda

Jika Anda menyambungkan perangkat ke komputer dengan kabel USB dan iTunes tidak mengenali iPhone, iPad, atau iPod, segera dapatkan bantuan.

Jika iTunes di komputer tidak mengenali perangkat yang terhubung, Anda akan melihat pesan kesalahan yang tidak diketahui atau kesalahan "0xE". Jika demikian, ikuti langkah-langkah ini dan coba sambungkan kembali perangkat setelah melakukan setiap langkah:
  1. Pastikan perangkat iOS Anda tidak terkunci dan membuka layar Utama.
  2. Pastikan Anda memiliki iTunes versi terbaru yang berfungsi dengan komputer Anda.
  3. Pastikan Anda memiliki perangkat lunak terbaru di Mac atau PC Windows.
  4. Pastikan perangkat telah dihidupkan.
  5. Jika Anda melihat peringatan Percayai Komputer Ini, buka kunci perangkat dan ketuk Percayai.
  6. Lepas semua aksesori USB dari komputer selain untuk perangkat Anda. Coba setiap port USB untuk mengetahui apakah port tersebut berfungsi. Setelah itu, coba kabel USB Apple lain.*
  7. Mulai ulang komputer dan iPhone, iPad, atau iPod.
  8. Coba sambungkan perangkat ke komputer lainnya. Jika Anda memiliki masalah yang sama di komputer lainnya, hubungi Dukungan Apple.

Untuk memperoleh bantuan lebih lanjut, ikuti langkah-langkah di bawah ini untuk Mac atau PC Windows Anda.

* Pelajari cara menyambungkan iPad Pro (11 inci) atau iPad Pro 12,9 inci (generasi ke-3) ke komputer Anda.

Jika Anda menggunakan Mac

  1. Sambungkan perangkat iOS Anda dan pastikan perangkat tersebut tidak terkunci dan membuka layar Utama.
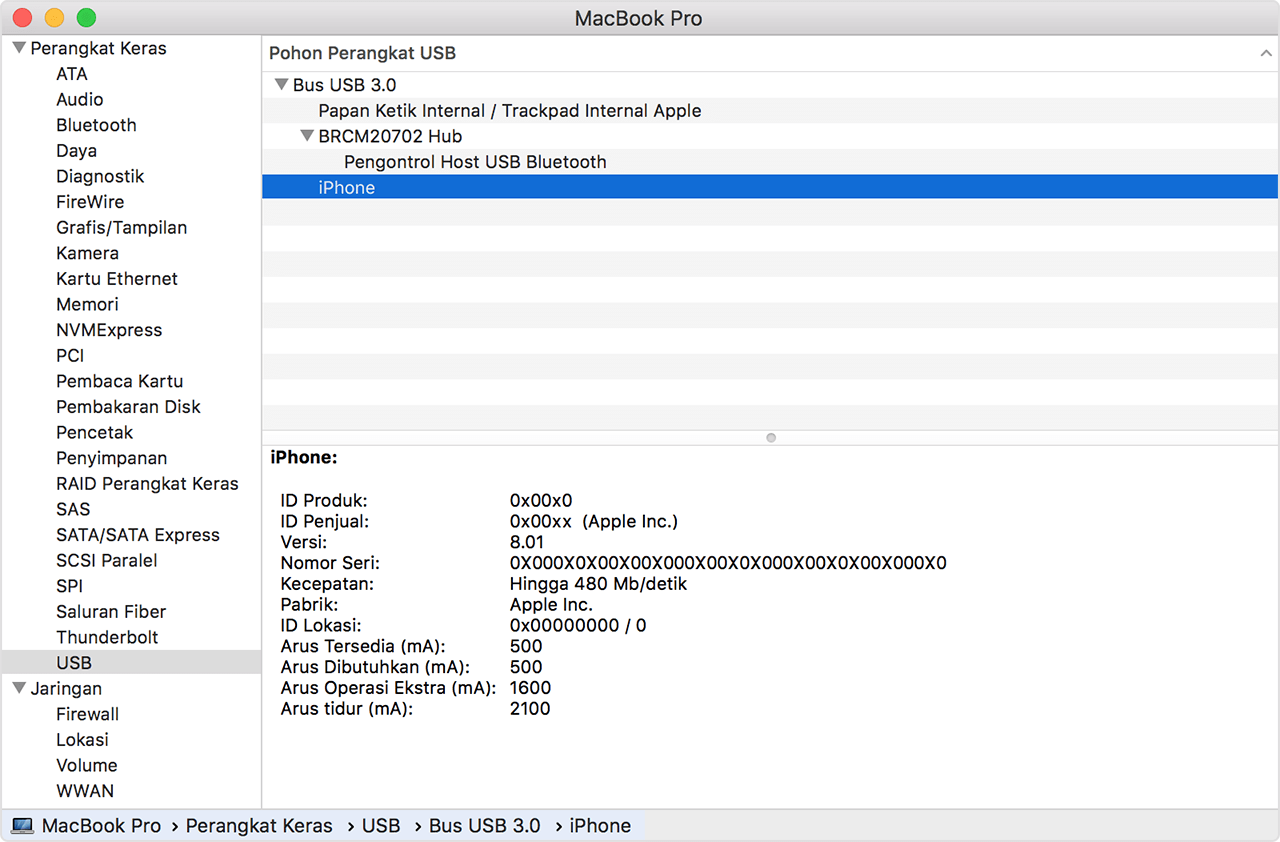
  2. Di Mac Anda, tahan tombol Pilihan, klik menu Apple, dan pilih Informasi Sistem atau Laporan Sistem.
  3. Dari daftar di samping kiri, pilih USB. 
  4. Jika Anda melihat iPhone, iPad, atau iPod pada Pohon Perangkat USB, hapus instalasi perangkat lunak keamanan pihak ketiga. Jika tidak, hubungi Dukungan Apple.

Jika Anda menggunakan PC Windows

Tahapan dapat berbeda tergantung apakah Anda mengunduh iTunes dari Microsoft Store atau dari Apple.

Jika Anda mengunduh iTunes dari Microsoft Store

Ikuti langkah-langkah berikut untuk menginstal ulang driver USB Perangkat Bergerak Apple:
  1. Lepaskan perangkat Anda dari komputer.
  2. Buka kunci perangkat iOS dan buka layar Utama. Kemudian, sambungkan kembali perangkat. Jika terbuka, tutup iTunes.
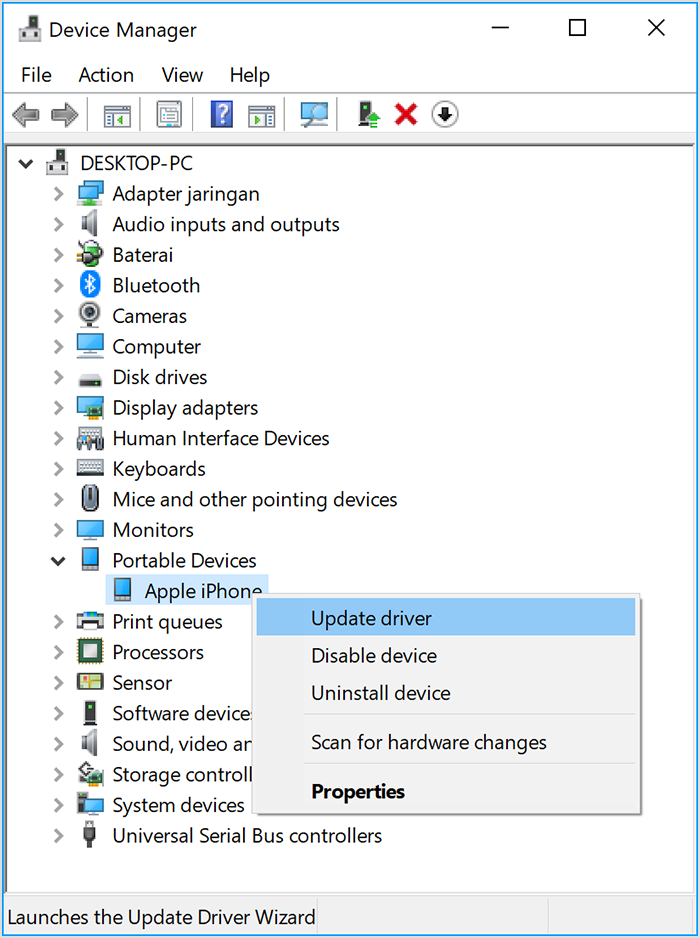
  3. Klik dan tahan (atau klik kanan) tombol Mulai, kemudian pilih Manajer Perangkat.
  4. Cari dan perluas bagian Perangkat Portabel.
  5. Cari perangkat Anda yang tersambung (seperti Apple iPhone), lalu klik kanan nama perangkat dan pilih Perbarui driver.
  6. Pilih "Cari perangkat lunak driver yang diperbarui secara otomatis."
  7. Setelah perangkat lunak diinstal, buka Pengaturan > Pembaruan & Keamanan > Pembaruan Windows, lalu verifikasikan bahwa tidak ada pembaruan lain yang tersedia.
  8. Buka iTunes.

Jika Anda mengunduh iTunes dari Apple

Ikuti langkah-langkah berikut untuk menginstal ulang driver USB Perangkat Bergerak Apple:
  1. Lepaskan perangkat Anda dari komputer.
  2. Buka kunci perangkat iOS dan buka layar Utama. Kemudian, sambungkan kembali perangkat. Jika terbuka, tutup iTunes.
  3. Tekan tombol Windows dan R di keyboard untuk membuka perintah Jalankan.
  4. Di jendela Jalankan, masukkan:
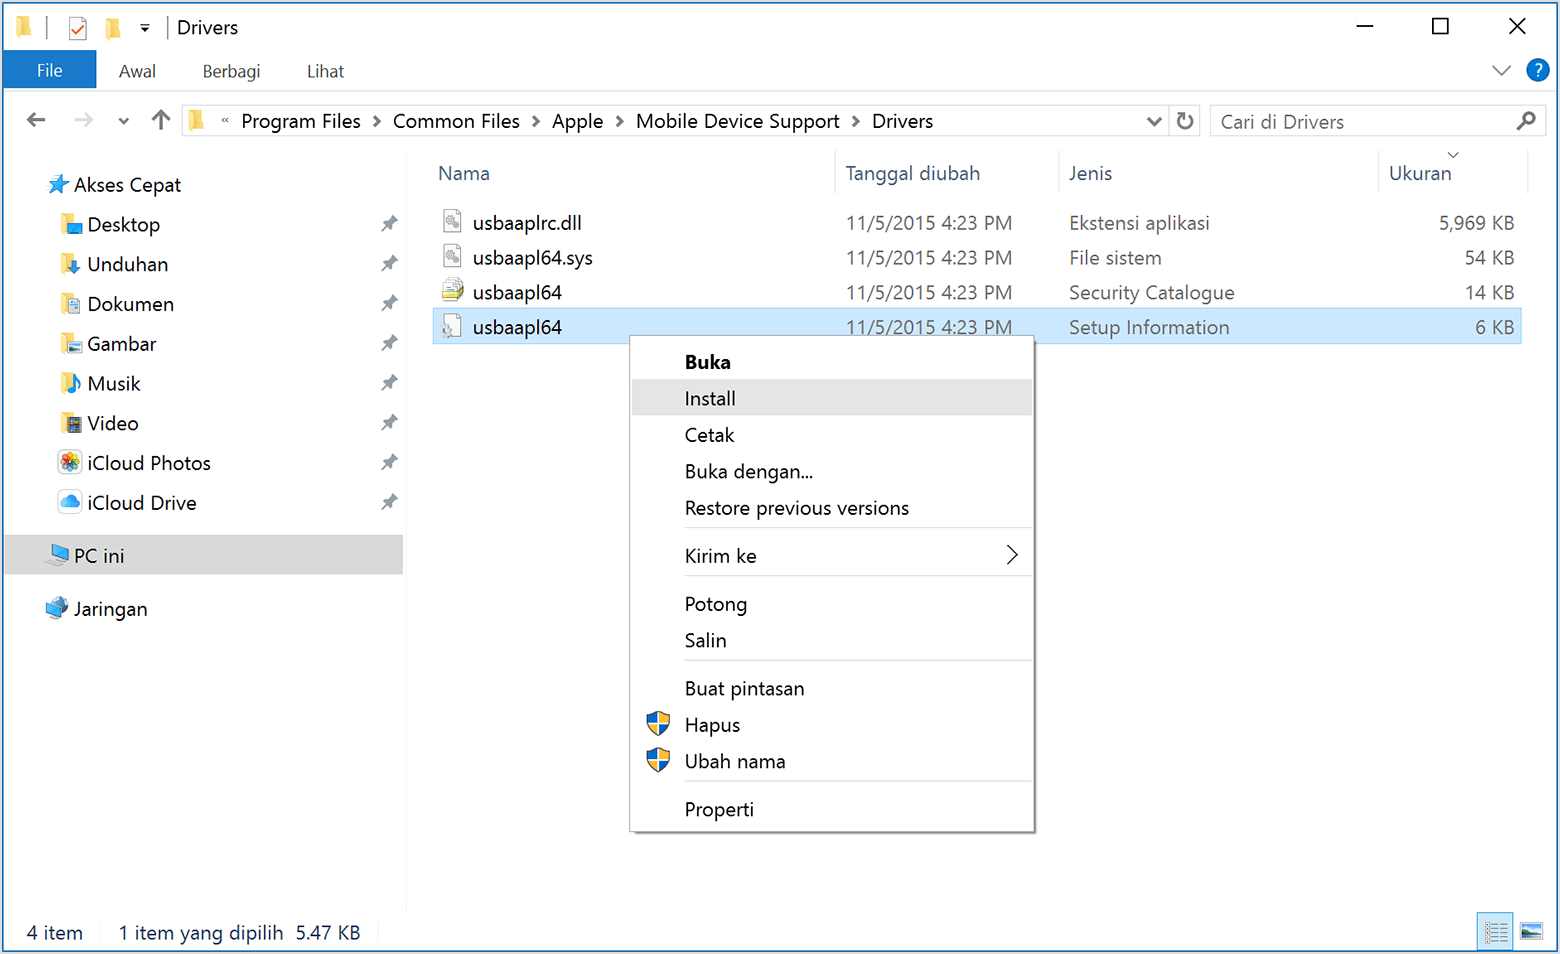
    %ProgramFiles%\Common Files\Apple\Mobile Device Support\Drivers
  5. Klik OK.
  6. Klik kanan file usbaapl64.inf atau usbaapl.inf lalu pilih Instal.

    Anda mungkin akan melihat file lainnya yang dimulai dengan usbaapl64 atau usbaapl. Pastikan Anda menginstal file yang diakhiri dengan .inf. Jika Anda tidak yakin dengan file yang akan diinstal, klik kanan bidang kosong di Jendela File Explorer, klik Lihat, lalu klik Rincian untuk menemukan jenis file yang benar. Anda ingin menginstal file Informasi Pengaturan.
  7. Putus sambungan perangkat dari komputer, lalu mulai ulang komputer.
  8. Sambungkan kembali perangkat dan buka iTunes.

Jika perangkat tetap tidak dapat dikenali

Periksa Manajer Perangkat untuk mengetahui apakah driver USB Perangkat Bergerak Apple telah diinstal. Ikuti langkah-langkah berikut untuk membuka Manajer Perangkat:
  1. Tekan tombol Windows dan R di keyboard untuk membuka perintah Jalankan.
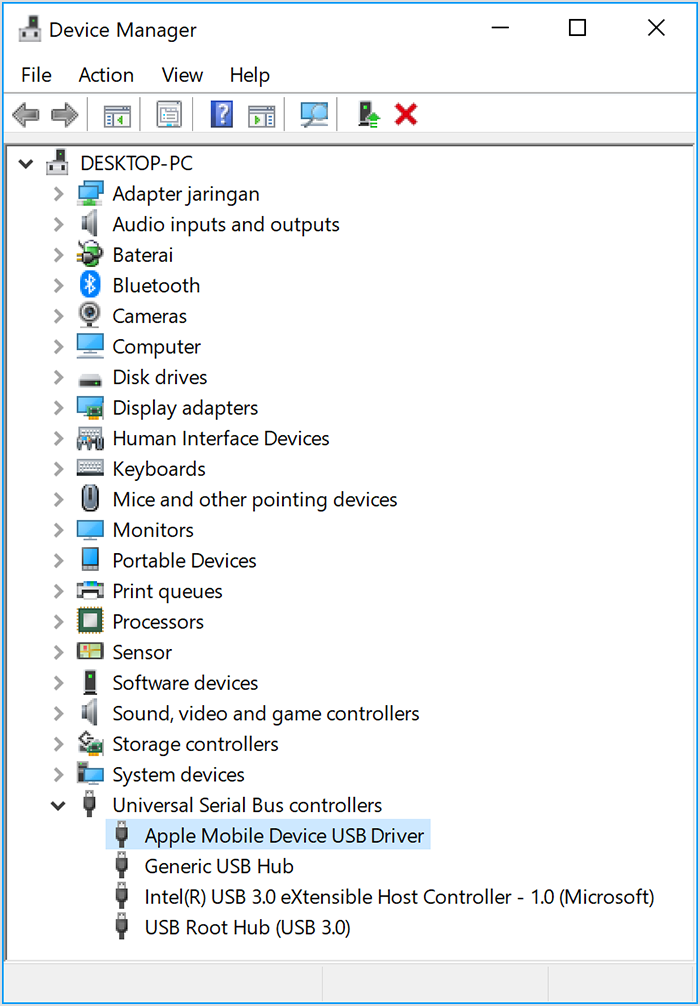
  2. Di jendela Jalankan, masukkan devmgmt.msc, lalu klik OK. Manajer Perangkat akan terbuka. 
  3. Mencari dan memperluas bagian pengontrol Universal Serial Bus.
  4. Cari driver USB Perangkat Bergerak Apple.

Jika Anda tidak dapat melihat Driver USB Perangkat Bergerak Apple atau melihat Perangkat yang Tidak Diketahui:

  • Sambungkan perangkat ke komputer dengan kabel USB lain.
  • Sambungkan perangkat ke komputer lain. Jika Anda memiliki masalah yang sama di komputer lainnya, hubungi Dukungan Apple.

Jika Anda melihat driver USB Perangkat Bergerak Apple dengan simbol kesalahan:

Jika Anda melihat , atau  di samping driver USB Perangkat Bergerak Apple, ikuti langkah-langkah berikut:
  1. Mulai ulang Layanan Perangkat Bergerak Apple.
  2. Periksa dan atasi masalah dengan perangkat lunak keamanan pihak ketiga, lalu mulai ulang komputer.
  3. Coba instal kembali file usbaapl64.inf atau usbaapl.inf.

Jika masalahnya masih berlanjut, hubungi Dukungan Apple.
Read More